 Connect to data: Overview

|

|
|
|

|
|

|
- Completing Step 2: Connect to data of the Getting Started tutorial is recommended.
Connecting to your data in Great Expectations is designed to be a painless process. Once you have performed this step, you will have a consistent API for accessing and validating data on all kinds of source data systems: SQL-type data sources, local and remote file stores, in-memory data frames, and more.
The connect to data process
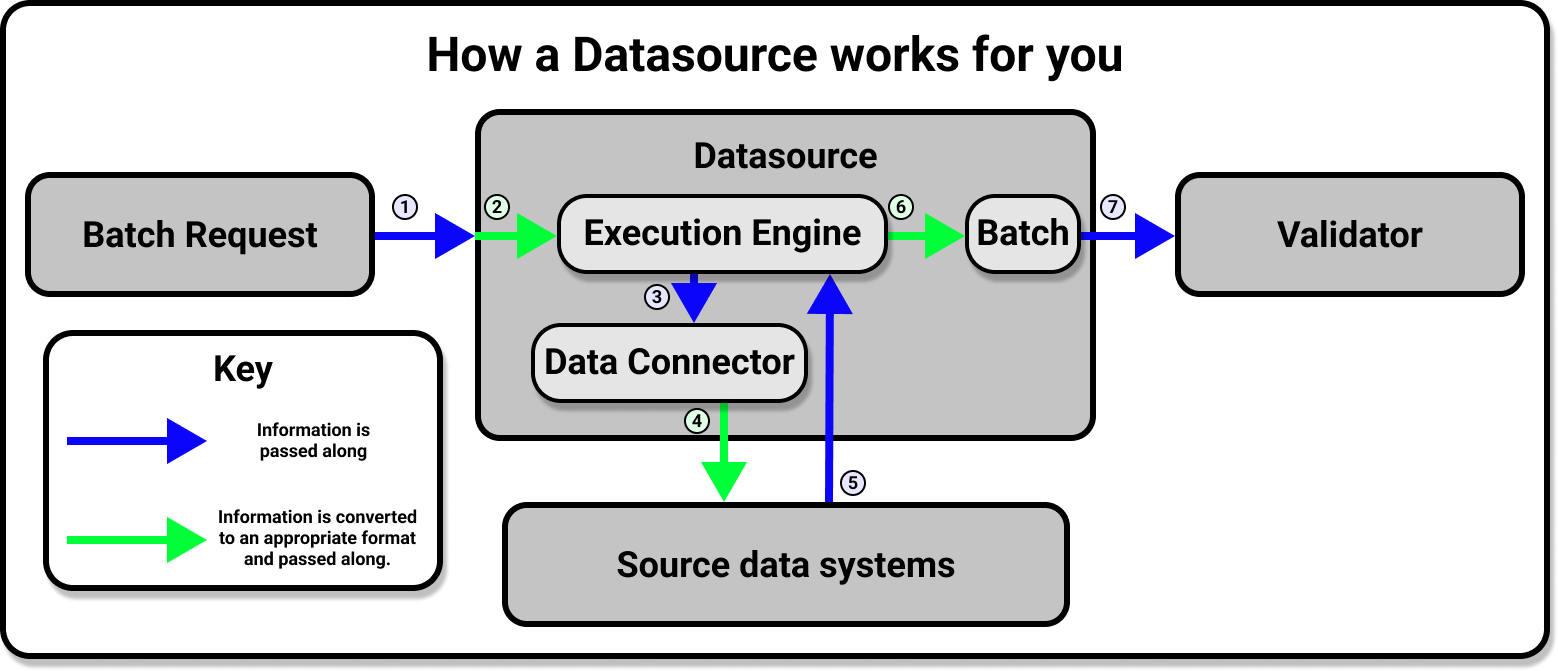
Connecting to your data is built around the DatasourceProvides a standard API for accessing and interacting with data from a wide variety of source systems. object. A Datasource provides a standard API for accessing and interacting with data from a wide variety of source systems. This makes working with Datasources very convenient!
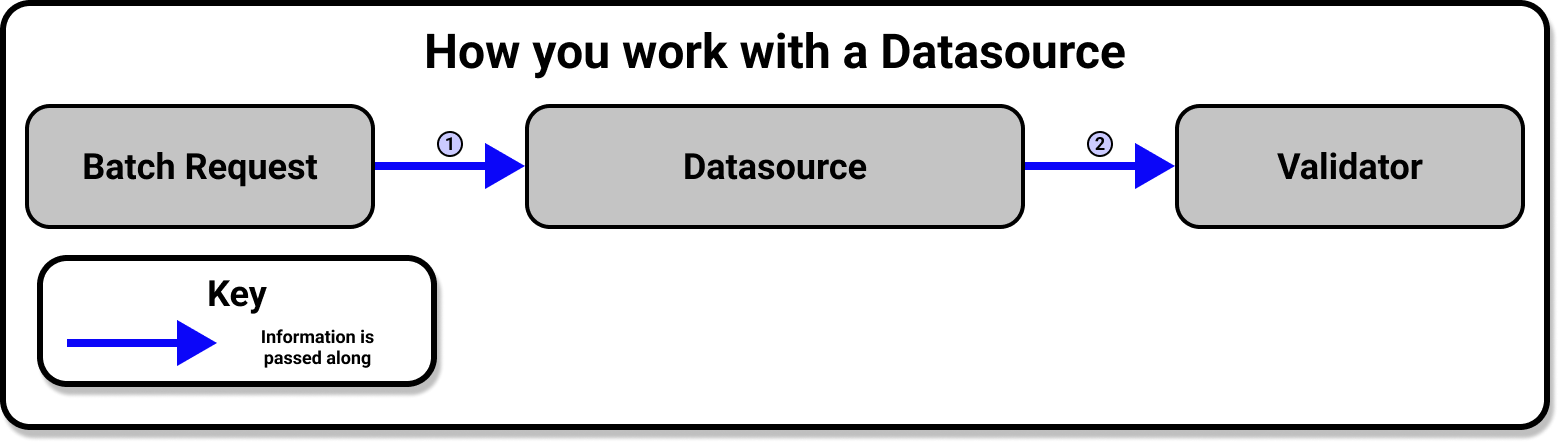
Behind the scenes, however, the Datasource is doing a lot of work for you. The Datasource provides an interface for a Data ConnectorProvides the configuration details based on the source data system which are needed by a Datasource to define Data Assets. and an Execution EngineA system capable of processing data to compute Metrics. to work together, and handles all the heavy lifting involved in communication between Great Expectations and your source data systems.
The majority of the work involved in connecting to data is a simple matter of configuring a new Datasource according to the requirements of your underlying data system. Once your Datasource is configured and saved to your Data ContextThe primary entry point for a Great Expectations deployment, with configurations and methods for all supporting components. you will only need to use the Datasource API to access and interact with your data, regardless of the original source system (or systems) that your data is stored in.
1. Prepare scaffolding
If you use the Great Expectations CLICommand Line Interface, you can run this command to automatically generate a pre-configured Jupyter Notebook:
great_expectations datasource new
From there, you will be able to follow along a YAML based workflow for configuring and saving your Datasource. Whether you prefer to work with the Jupyter Notebook's boilerplate for creating a datasource, or would rather dive in from scratch with a Python script, however, most of the work will take place in the configuring of the Datasource in question.
2. Configure your Datasource
Because the underlying data systems are different, configuration for each type of Datasource is slightly different. We have step by step how-to guides that cover many common cases, and core concepts documentation to help you with more exotic kinds of configuration. It is strongly advised that you find the guide that pertains to your use case and follow it. If you are simply interested in learning about the process, however, the following will give you a broad overview of what you will be doing regardless of what your underlying data systems are.
Datasource configurations can be written as YAML files or Python dictionaries. Regardless of variations due to the underlying data systems, your Datasource's configuration will look roughly like this:
- YAML
- Python
datasource_yaml = f"""
name: <name_of_your_datasource>
class_name: Datasource
execution_engine:
    class_name: <class_of_execution_engine>
data_connectors:
    <name_of_your_data_connector>:
        class_name: <class_of_data_connector>
        <additional_keys_based_on_source_data_system>: <corresponding_values>
"""
datasource_config = {
    "name": "<name_of_your_datasource>",
    "class_name": "Datasource",
    "execution_engine": {"class_name": "<class_of_execution_engine>"},
    "data_connectors": {
        "<name_of_your_data_connector>": {
            "class_name": "<class_of_data_connector>",
            "<additional_keys_based_on_source_data_system>": "<corresponding_values>"
        }
    }
}
Please note that this is just a broad outline of the configuration you will be making. You will find much more detailed examples in our documentation on how to connect to specific source data systems.
The name and class_name top
level keys will be the first you need to define. The
name key can be anything you want, but it
is best to use a descriptive name as you will use this
to reference your Datasource in the future. Unless you
are extending Great Expectations and using a subclass
of Datasource, you will almost never need to use a
class_name other than
Datasource for the top level
class_name value.
Configuring your Datasource's Execution Engine
After your Datasource's configuration has a
name and class_name defined,
you will need to define a single
execution_engine. In your configuration
the value of your execution_engine will
at the very least contain the
class_name of your Execution Engine, and
may also include a connection_string if
your source data system requires one.
Great Expectations supports Pandas, Spark, and
SqlAlchemy as execution engines. The corresponding
Execution Engine class names are
PandasExecutionEngine,
SparkDFExecutionEngine, and
SqlAlchemyExecutionEngine.
Configuring your Datasource's Data Connectors
Great Expectations provides three types of
DataConnector classes, which are useful
in various situations. Which Data Connector you will
want to use will depend on the format of your source
data systems.
-
In filesystems, an
InferredAssetDataConnectorinfers thedata_asset_nameby using a regex that takes advantage of patterns that exist in the filename or folder structure. If your source data system is designed so that it can easily be parsed by regex, this will allow new data to be included by the Datasource automatically. TheInferredAssetSqlDataConnectorprovides similar functionality for SQL based source data systems. -
A
ConfiguredAssetDataConnector, which allows you to have the most fine-tuning by requiring an explicit listing of each Data AssetA collection of records within a Datasource which is usually named based on the underlying data system and sliced to correspond to a desired specification. you want to connect to. -
A
RuntimeDataConnectorwhich enables you to use aRuntimeBatchRequestto wrap either an in-memory dataframe, filepath, or SQL query.
In the data_connectors dictionary you may
define multiple Data Connectors, including different
types of Data Connectors, so long as they all have
unique values in the place of the
<name_of_your_data_connector> key.
We provide detailed guidance to help you decide on
which Data Connectors to use in our guide:
How to choose which DataConnector to use.
The
<additional_keys_based_on_source_data_system>
will be things like batch_identifiers,
base_directory, and
default_regex for filesystems, or
batch_identifiers for SQL based data
systems. For specifics on the additional keys that you
can use in your Data Connectors' configurations,
please see the corresponding guide for connecting to a
specific source data system (since the keys you will
need to define will depend on the source data system
you are connecting to).
3. Test your configuration
Because the configurations for Datasources can vary
depending on the underlying data system they are
connecting to, Great Expectations provides a
convenience function that will help you determine if
there are errors in your configuration. This function
is test_yaml_config(). Using
test_yaml_config in a Jupyter Notebook is
our recommended method for testing Datasource
configuration. Of course, you can always edit and test
YAML configs manually, and instantiate Datasources
through code. When executed,
test_yaml_config() will instantiate the
component and run through a self check procedure to
verify the component works as expected.
In the case of a Datasource, this means:
- confirming that the connection works.
- gathering a list of available DataAssets (e.g. tables in SQL; files or folders in a filesystem)
- verifying that it can successfully fetch at least one BatchA selection of records from a Data Asset. from the source.
If something about your configuration wasn't set
up correctly, test_yaml_config() will
raise an error. Whenever possible,
test_yaml_config() provides helpful
warnings and error messages. It can't solve every
problem, but it can solve many.
You can call test_yaml_config() from your
Data Context, like so:
- YAML
- Python
import great_expectations as gx

datasource_yaml = ""  # Replace this with the yaml string you want to check for errors.

context = gx.get_context()
context.test_yaml_config(datasource_yaml)
import great_expectations as gx
from ruamel import yaml

datasource_config = {}  # Replace this with the Python dictionary you want to check for errors.

context = gx.get_context()
context.test_yaml_config(yaml.dump(datasource_config))
From here, iterate by editing your config to add
config blocks for additional introspection,Data
Assets, sampling, etc. After each addition re-run
test_yaml_config() to verify the addition
is functional, then move on to the next iteration of
editing your config.
4. Save the Datasource configuration to your Data Context.
What is the point of configuring a Datasource if you
can't easily use it in the future? At this point
you will want to save your Datasource configuration to
your Data Context. This can be done easily by using
the add_datasource() function, which is
conveniently accessible from your Data Context.
- YAML
- Python
The function add_datasource() takes
in a series of named arguments corresponding to
the keys in your
datasource_yaml string.
Fortunately, python and the
yaml module provide a convenient
way to unpack yaml strings into named arguements
so you don't have to.
First, you will want to import the yaml module with the command:
from ruamel import yaml
After that, the following code snippet will unpack your yaml string and save your Datasource configuration to the Data Context:
context.add_datasource(**yaml.load(datasource_yaml))
The function add_datasource() takes
in a series of named arguments corresponding to
the keys in your
datasource_config dictionary.
Fortunately, python provides a convenient way to
unpack dictionaries into named arguements, so
you don't have to. The following code
snippet will unpack the dictionary and save your
Datasource configuration to the Data Context.
context.add_datasource(**datasource_config)
5. Test your new Datasource.
To test your Datasource you will load data from it into a ValidatorUsed to run an Expectation Suite against data. using a Batch RequestProvided to a Datasource in order to create a Batch.. All of our guides on how to configure a Datasource conclude with an example of how to do this for that guide's particular source data system. This is also a core part of using ProfilersGenerates Metrics and candidate Expectations from data. and CheckpointsThe primary means for validating data in a production deployment of Great Expectations., so we will discuss it in more depth in the Create Expectations and Validate Data steps.
Accessing your Datasource from your Data Context
If you need to directly access your Datasource in the
future, the get_datasource() method of
your Data Context will provide a convenient way to do
so. You can also use the
list_datasources() method of your Data
Context to retrieve a list containing your datasource
configurations.
Retrieving Batches of data with your Datasource
This is primarily done when running Profilers in the Create Expectation step, or when running Checkpoints in the Validate Data step, and will be covered in more detail in those sections of the documentation.
Wrapping up
With your Datasources defined, you will now have access to the data in your source systems from a single, consistent API. From here you will move on to the next step of working with Great Expectations: Create Expectations.