 Create Expectations: Overview

|

|

|
|
|
|

|
- Completing Step 3: Create Expectations of the Getting Started tutorial is recommended.
Creating ExpectationsA verifiable assertion about data. is an integral part of Great Expectations. By the end of this step, you will have created an Expectation SuiteA collection of verifiable assertions about data. containing one or more Expectations which you will use when you ValidateThe act of applying an Expectation Suite to a Batch. data.
The Create Expectations process
There are a few workflows you can potentially follow when creating Expectations. These workflows represent various ways of creating Expectations, although they converge in the end when you will save and test those Expectations.
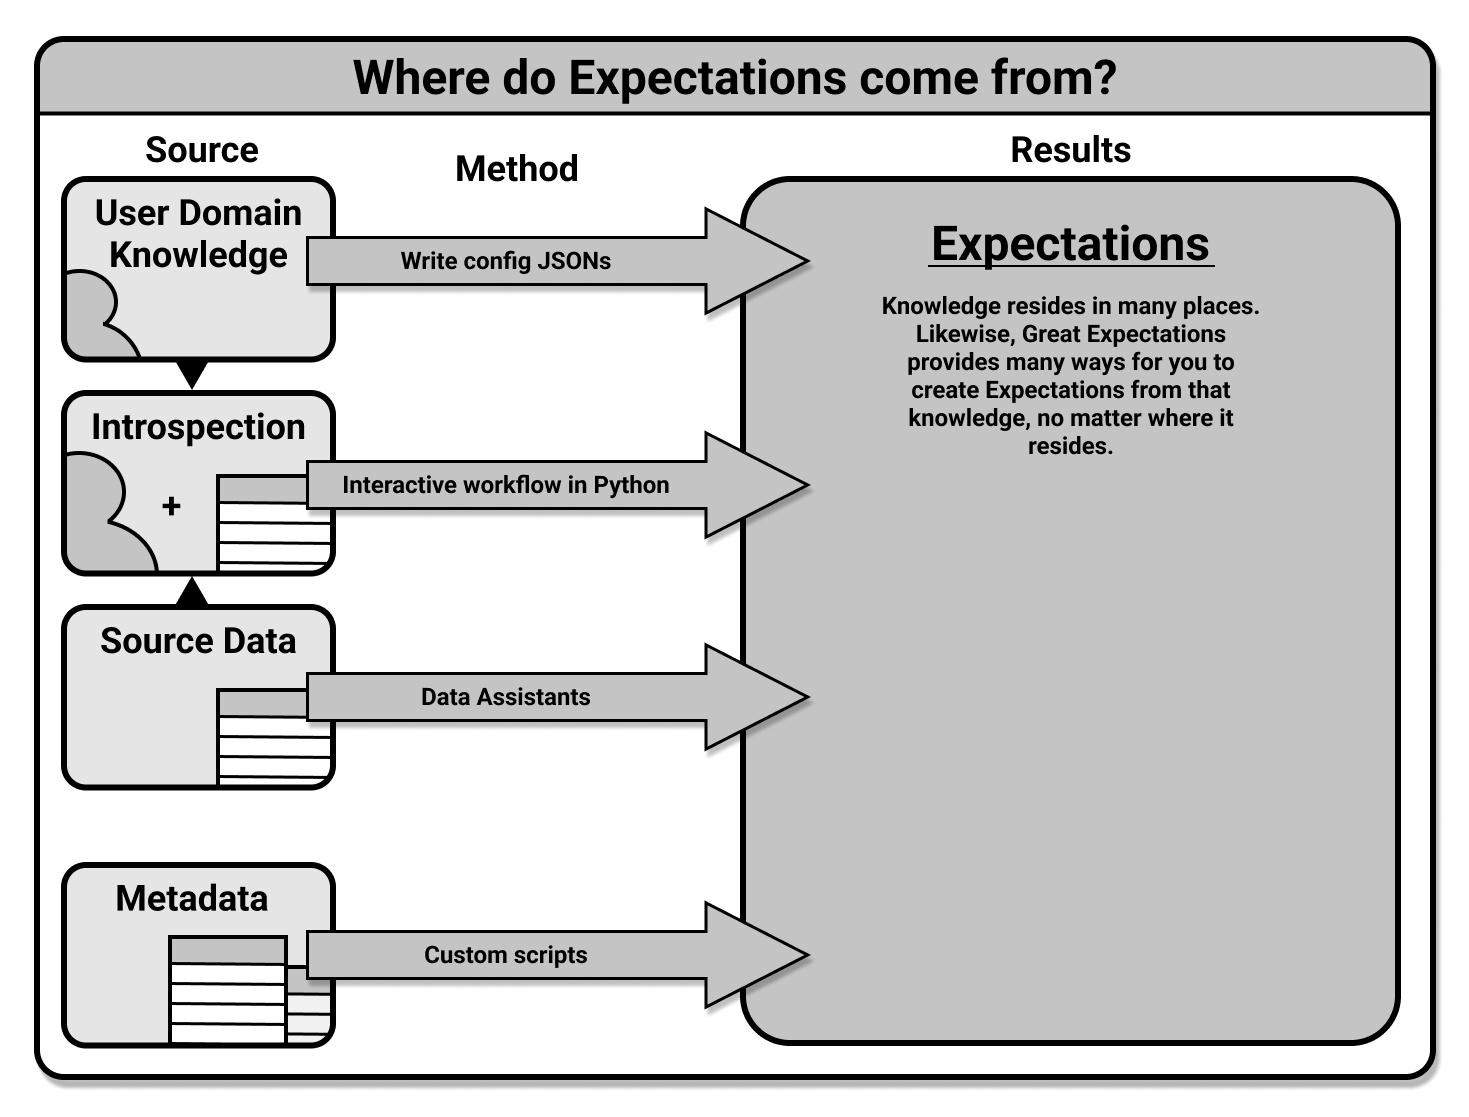
Of the four potential ways to create Expectations illustrated above, two are recommended in particular.
The first recommended workflow of those illustrated above is the interactive workflow. In this workflow, you will be working in a Python interpreter or Jupyter notebook. You will use a ValidatorUsed to run an Expectation Suite against data. and call expectations as methods on it to define Expectations in an Expectation Suite, and when you have finished you will save that Expectation Suite into your Expectation StoreA connector to store and retrieve information about collections of verifiable assertions about data.. A more thorough overview of this workflow, and a link to an in-depth guide on it, can be found in this document's section on creating Expectations interactively.
The second recommended workflow is the Data Assistant workflow. In this workflow, you will use a Data AssistantA utility that asks questions about your data, gathering information to describe what is observed, and then presents Metrics and proposes Expectations based on the answers. to generate Expectations based on some input data. You may then preview the metrics that these Expectations are based on. Finally, you save can the generated Expectations as an Expectation Suite in an Expectation Store. A more thorough overview of this workflow, and a link to an in-depth guide on it, can be found in this document's section on creating Expectations with Data Assistants.
The third workflow, which is for advanced users, is to manually define your Expectations by writing their configurations. This workflow does not require source data to work against, but does require a deep understanding of the configurations available for Expectations. We will forgo discussion of it in this document, and focus on the two recommended workflows. If for some reason you must use this workflow, we do provide an in-depth guide to it in our documentation on how to create and edit expectations based on domain knowledge without inspecting data directly.
Some advanced users have also taken advantage of the fourth workflow, and have written custom methods that allow them to generate Expectations based on the metadata associated with their source data systems. This process for creating Expectations is outside the scope of this overview, and will not be discussed in depth here. However, if it is something you are interested in pursuing, you are encouraged to reach out to us on Slack.
When following one of the first two workflows, once you have saved your Expectation Suite it is advised that you test it by validating your Expectations against the BatchA selection of records from a Data Asset. or Batches of data against which you created them. This process is the same in either workflow, since at this point you will be using a saved Expectation Suite and each of the prior workflows ends with the saving of your Expectation Suite. Instructions for this will be detailed in this document's section on testing your Expectation Suite.
Creating Expectations interactively
When using the interactive method of creating
Expectations, you will start as you always do with
your
Data ContextThe primary entry point for a Great Expectations
deployment, with configurations and methods for
all supporting components.. In this case, you will want to navigate to your
Data Context's root directory in your terminal,
where you will use the
CLICommand Line Interface
to launch a Jupyter Notebook which will contain
scaffolding to assist you in the process. You can even
provide flags such as --profile which
will allow you to enter into the interactive workflow
after using a Profiler to generate and prepopulate
your Expectation Suite.
We provide an in-depth guide to using the CLI (and what flags are available to you) for interactively creating Expectations in our guide on how to create and edit Expectations with instant feedback from a sample batch of data.
Creating Expectations with Data Assistants
As with creating Expectations interactively, you will start with your Data Context. However, in this case you will be working in a Python environment, so you will need to load or create your Data Context as an instantiated object. Next, you will create a Batch Request to specify the data you would like to ProfileThe act of generating Metrics and candidate Expectations from data. with your Data Assistant. Once you have a Batch RequestProvided to a Datasource in order to create a Batch. configured you will use it as the input for the run method of your Data Assistant, which can be accessed from your Data Context object. Once the Data Assistant has run, you will be able to review the results as well as save the generated Expectations to an empty Expectation Suite.
The Data Assistant we recommend using for new data is the Onboarding Data Assistant. We provide an in-depth guide to this in our documentation on how to create an Expectation Suite with the Onboarding Data Assistant.
Testing your Expectation Suite
Once you have created your Expectation Suite and saved
it, you may wish to test it. The simplest way to do
this is to Validate some data against it. You can do
this using a SimpleCheckpoint as
demonstrated in the
optional step on running validation, saving your
suite, and building Data Docs
of our
how to create and edit Expectations with a
Profiler
documentation. Or you can just move on to
Step 4: Validate Data.
Editing a saved Expectation Suite
It may be that you have saved an Expectation Suite that you wish to go back to and edit. The simplest way to do this is to use the CLI. You can use the command:
great_expectations suite edit NAME_OF_YOUR_SUITE_HERE
This will open a Jupyter Notebook that contains the configurations for each of that Expectation Suite's Expectations in their own cells. You can edit these cells and then run them to generate Expectations in a new Expectation Suite. Once your edited version of the Expectations have been created in their own Expectation Suite, you can save that Expectation Suite over the pre-existing one, or save it as a new suite altogether.
Wrapping up
At this point you have created an Expectation Suite, saved it to your Expectation Store, and are ready to use it in a CheckpointThe primary means for validating data in a production deployment of Great Expectations. in the Validate Data step! If you wish, you can check your Expectation Store where you will see a json file that contains your Expectation Suite. You won't ever have to manually edit it, but you can view its contents if you are curious about how the Expectations are configured or if you simply want to verify that it is there. You can also see the Expectation Suites that you have saved by using the CLI command:
great_expectations suite list
This command will list all the saved Expectation Suites in your Data Context.
As long as you have a saved Expectation Suite with which to work, you'll be all set to move on to Step 4: Validate Data.