How to create an Expectation Suite with the Onboarding Data Assistant
This guide demonstrates how to use the Onboarding Data Assistant to Profile your data and automate the generation of an Expectation Suite, which you can then adjust to be suited for your specific needs.
This process mirrors that of the Jupyter Notebook that is created when you run the following CLI command:
great_expectations suite new --profile
Prerequisites: This how-to guide assumes you have:
- Completed the Getting Started Tutorial
- A working installation of Great Expectations
- A configured Data Context.
- The knowledge to configure and save a Datasource.
- The knowledge to configure and save a Batch Request.
Steps
1. Prepare your Batch Request
Data Assistants excel at automating the Profiling process across multiple Batches. Therefore, for this guide you will be using a Batch Request that covers multiple Batches. For the purposes of this demo, the Datasource that our Batch Request queries will consist of a sample of the New York taxi trip data.
This is the configuration that you will use for your Datasource:
datasource_config = {
    "name": "taxi_multi_batch_datasource",
    "class_name": "Datasource",
    "module_name": "great_expectations.datasource",
    "execution_engine": {
        "module_name": "great_expectations.execution_engine",
        "class_name": "PandasExecutionEngine",
    },
    "data_connectors": {
        "inferred_data_connector_all_years": {
            "class_name": "InferredAssetFilesystemDataConnector",
            "base_directory": "<path_to_your_data_here>",
            "default_regex": {
                "group_names": ["data_asset_name", "year", "month"],
                "pattern": "(yellow_tripdata_sample)_(\\d.*)-(\\d.*)\\.csv",
            },
        },
    },
}
And this is the configuration that you will use for your BatchRequest:
multi_batch_all_years_batch_request: BatchRequest = BatchRequest(
    datasource_name="version-0.15.50 taxi_multi_batch_datasource",
    data_connector_name="version-0.15.50 inferred_data_connector_all_years",
    data_asset_name="version-0.15.50 yellow_tripdata_sample",
)
The Onboarding Data Assistant will run a high volume of queries against your Datasource. Data Assistant performance
can vary significantly depending on the number of Batches, count of records per Batch, and network latency. It is
recommended that you start with a smaller BatchRequest if you find that Data Assistant runtimes are too long.
2. Prepare a new Expectation Suite
Preparing a new Expectation Suite is done with the Data Context's add_expectation_suite(...) method, as seen in
this code example:
expectation_suite_name = "version-0.15.50 my_onboarding_assistant_suite"

expectation_suite = context.add_or_update_expectation_suite(
    expectation_suite_name=expectation_suite_name
)
3. Run the Onboarding Data Assistant
Running a Data Assistant is as simple as calling the run(...) method for the appropriate assistant.
That said, there are numerous parameters available for the run(...) method of the Onboarding Data Assistant. For
instance, the exclude_column_names parameter allows you to provide a list columns that should not be Profiled.
For this guide, you will exclude the following columns:
exclude_column_names = [
    "VendorID",
    "pickup_datetime",
    "dropoff_datetime",
    "RatecodeID",
    "PULocationID",
    "DOLocationID",
    "payment_type",
    "fare_amount",
    "extra",
    "mta_tax",
    "tip_amount",
    "tolls_amount",
    "improvement_surcharge",
    "congestion_surcharge",
]
The following code shows how to run the Onboarding Assistant. In this code block, context is an instance of your Data Context.
data_assistant_result = context.assistants.onboarding.run(
    batch_request=multi_batch_all_years_batch_request,
    exclude_column_names=exclude_column_names,
)
If you consider your BatchRequest data valid, and want to produce Expectations with ranges that are identical to the
data in the BatchRequest, there is no need to alter the command above. You will be using the default estimation parameter ("exact").
If you want to identify potential outliers in your BatchRequest data, pass estimation="flag_outliers" to the run(...) method.
The Onboarding Data Assistant run(...) method can accept other parameters in addition to exclude_column_names such
as include_column_names, include_column_name_suffixes, and cardinality_limit_mode.
For a description of the available parameters please see this docstring here.
4. Save your Expectation Suite
Once you have executed the Onboarding Data Assistant's run(...) method and generated Expectations for your data, you
need to load them into your Expectation Suite and save them. You will do this by using the Data Assistant result:
expectation_suite = data_assistant_result.get_expectation_suite(
    expectation_suite_name=expectation_suite_name
)
And once the Expectation Suite has been retrieved from the Data Assistant result, you can save it like so:
context.add_expectation_suite(expectation_suite=expectation_suite)
5. Test your Expectation Suite with a SimpleCheckpoint
To verify that your Expectation Suite is working, you can use a SimpleCheckpoint. First, you will configure one to
operate with the Expectation Suite and Batch Request that you have already defined:
checkpoint_config = {
    "class_name": "SimpleCheckpoint",
    "validations": [
        {
            "batch_request": multi_batch_all_years_batch_request,
            "expectation_suite_name": expectation_suite_name,
        }
    ],
}
Once you have our SimpleCheckpoint's configuration defined, you can instantiate a SimpleCheckpoint and run it. You
can check the "success" key of the SimpleCheckpoint's results to verify that your Expectation Suite worked.
checkpoint = SimpleCheckpoint(
    f"yellow_tripdata_sample_{expectation_suite_name}",
    context,
    **checkpoint_config,
)
checkpoint_result = checkpoint.run()

assert checkpoint_result["success"] is True
6. Plot and inspect the Data Assistant's calculated Metrics and produced Expectations
To see Batch-level visualizations of Metrics computed by the Onboarding Data Assistant run:
data_assistant_result.plot_metrics()
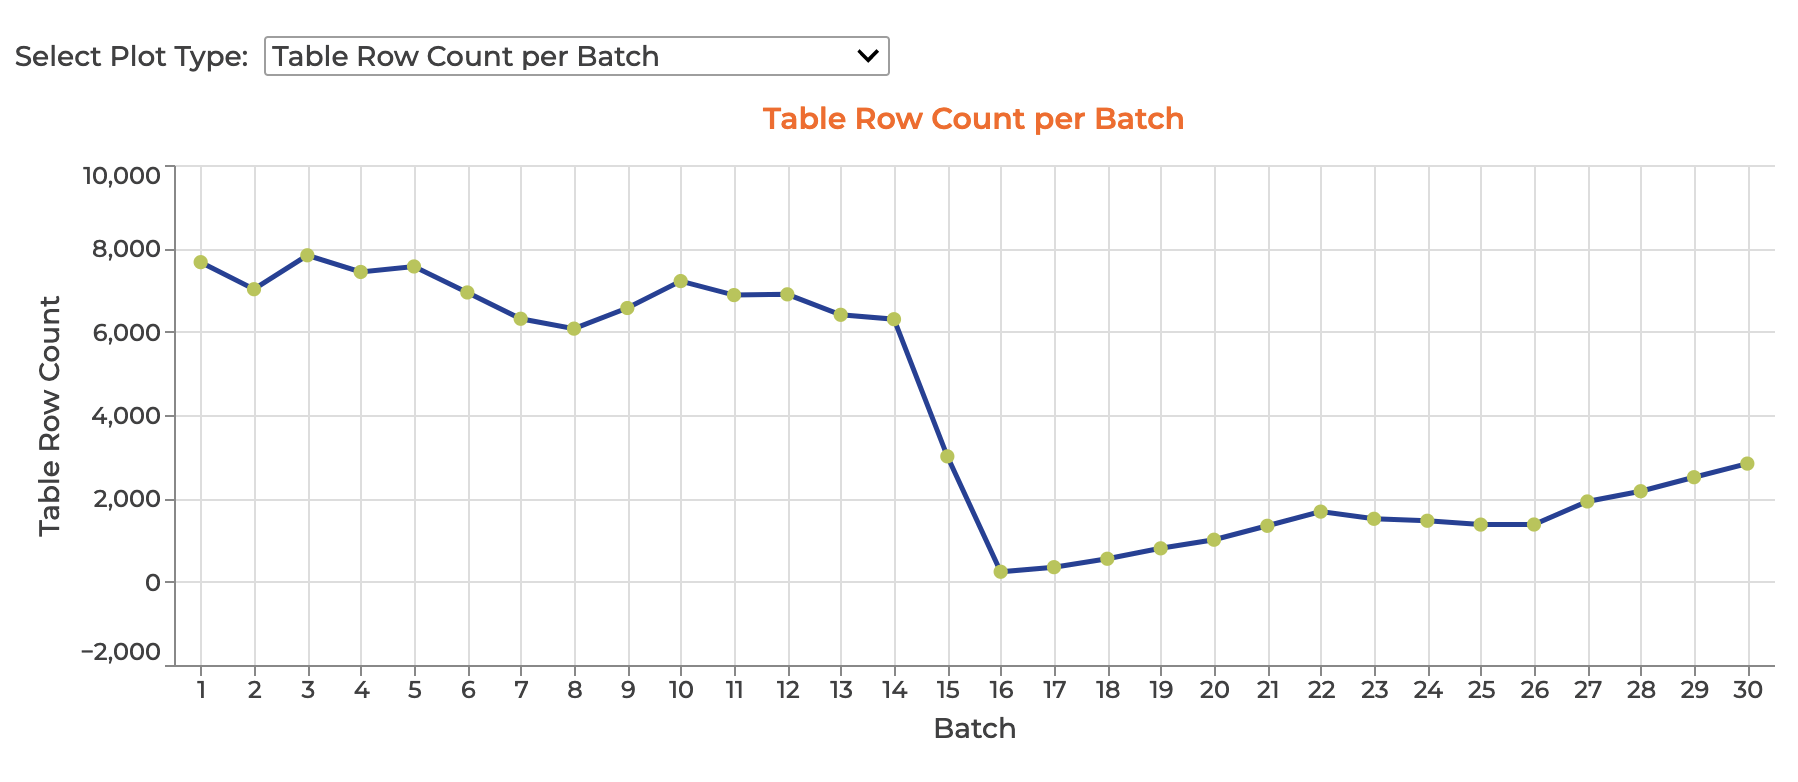
Hovering over a data point will provide more information about the Batch and its calculated Metric value in a tooltip.
To see all Metrics computed by the Onboarding Data Assistant run:
data_assistant_result.metrics_by_domain
To plot the Expectations produced, and the associated Metrics calculated by the Onboarding Data Assistant run:
data_assistant_result.plot_expectations_and_metrics()
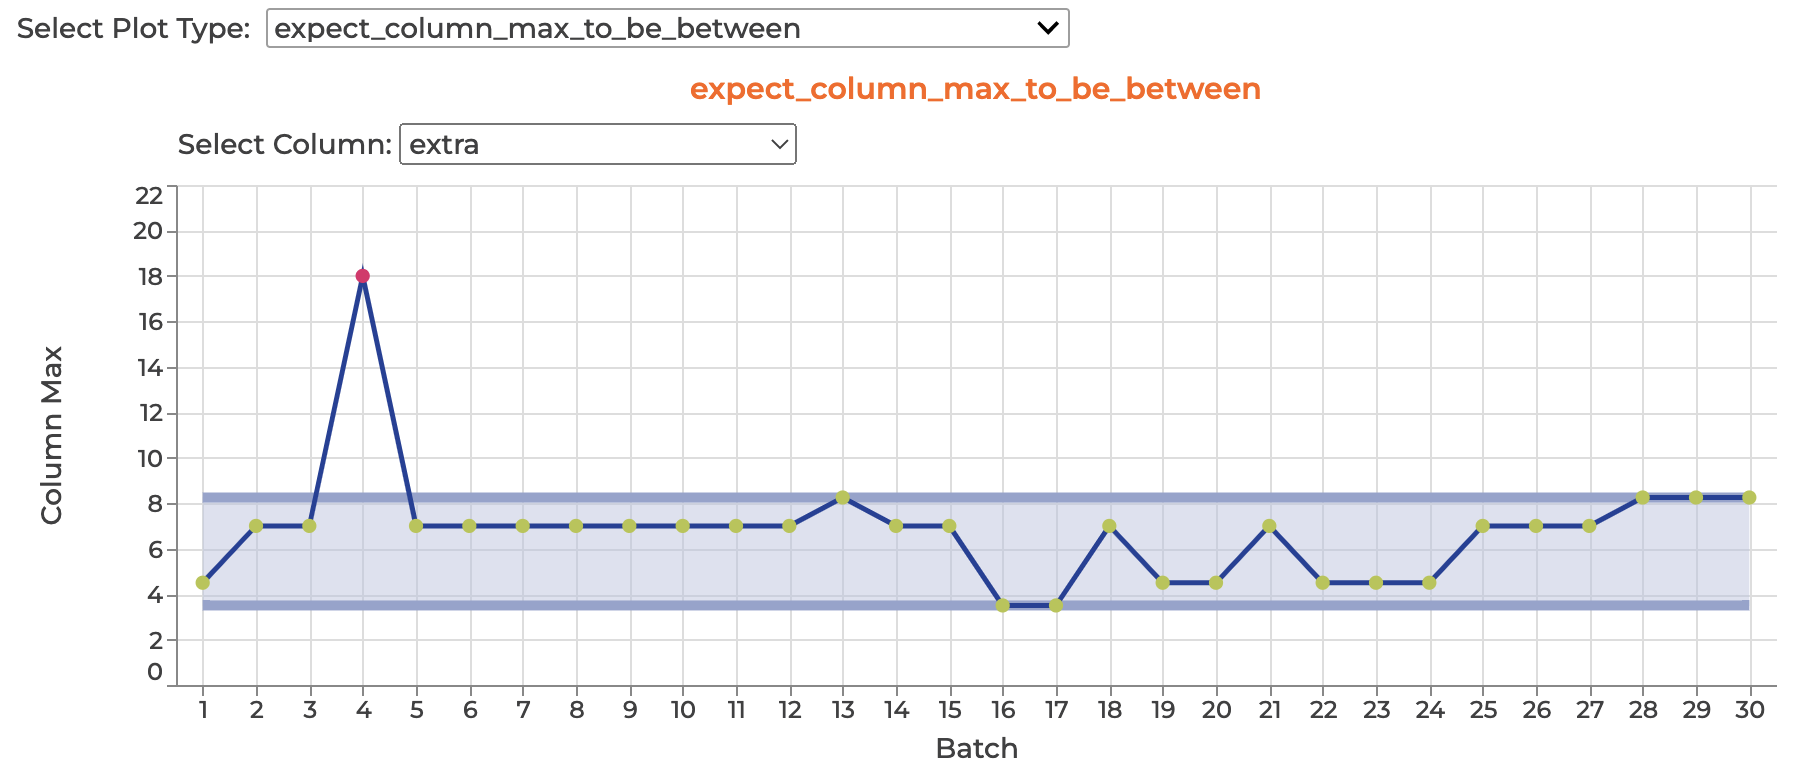
If no Expectation was produced by the Data Assistant for a given Metric, neither the Expectation nor the Metric will be visualized by the plot_expectations_and_metrics() method.
To see the Expectations produced and grouped by Domain run:
data_assistant_result.show_expectations_by_domain_type()
To see the Expectations produced and grouped by Expectation type run:
data_assistant_result.show_expectations_by_expectation_type()
7. (Optional) Edit your Expectation Suite, save, and test again.
The Onboarding Data Assistant will create as many applicable Expectations as it can for the permitted columns. This provides a solid base for analyzing your data, but may exceed your needs. It is also possible that you may possess some domain knowledge that is not reflected in the data that was sampled for the Profiling process. In either of these (or any other) cases, you can edit your Expectation Suite to more closely suite your needs.
To edit an existing Expectation Suite (such as the one that you just created and saved with the Onboarding Data Assistant) you need only execute the following console command:
great_expectations suite edit NAME_OF_YOUR_SUITE_HERE
This will open a Jupyter Notebook that will permit you to review, edit, and save changes to the specified Expectation Suite.
Additional Information
To view the full script used for example code on this page, see it on GitHub: