How to Use Great Expectations with Google Cloud Platform and BigQuery
This guide will help you integrate Great Expectations (GX) with Google Cloud Platform (GCP) using our recommended workflow.
Prerequisites: This how-to guide assumes you have:
- Completed the Getting Started Tutorial
- Have a working local installation of Great Expectations that is at least version 0.13.49.
- Have read through the documentation and are familiar with the Google Cloud Platform features that are used in this guide.
- Have completed the set-up of a GCP project with a running Google Cloud Storage container that is accessible from your region, and read/write access to a BigQuery database if this is where you are loading your data.
- Access to a GCP Service Account with permission to access and read objects in Google Cloud Storage, and read/write access to a BigQuery database if this is where you are loading your data.
Currently, Great Expectations will only install in Composer 1 and Composer 2 environments with the following packages pinned.
[tornado]==6.2
[nbconvert]==6.4.5
[mistune]==0.8.4
We are currently investigating ways to provide a smoother deployment experience in Google Composer, and will have more updates soon.
We recommend that you use Great Expectations in GCP by using the following services:
- Google Cloud Composer (GCC) for managing workflow orchestration including validating your data. GCC is built on Apache Airflow.
- BigQuery or files in Google Cloud Storage (GCS) as your DatasourceProvides a standard API for accessing and interacting with data from a wide variety of source systems.
- GCS for storing metadata (Expectation SuitesA collection of verifiable assertions about data., Validation ResultsGenerated when data is Validated against an Expectation or Expectation Suite., Data DocsHuman readable documentation generated from Great Expectations metadata detailing Expectations, Validation Results, etc.)
- Google App Engine (GAE) for hosting and controlling access to Data DocsHuman readable documentation generated from Great Expectations metadata detailing Expectations, Validation Results, etc..
We also recommend that you deploy Great Expectations to GCP in two steps:
- Developing a local configuration for GX that uses GCP services to connect to your data, store Great Expectations metadata, and run a Checkpoint.
- Migrating the local configuration to Cloud Composer so that the workflow can be orchestrated automatically on GCP.
The following diagram shows the recommended components for a Great Expectations deployment in GCP:
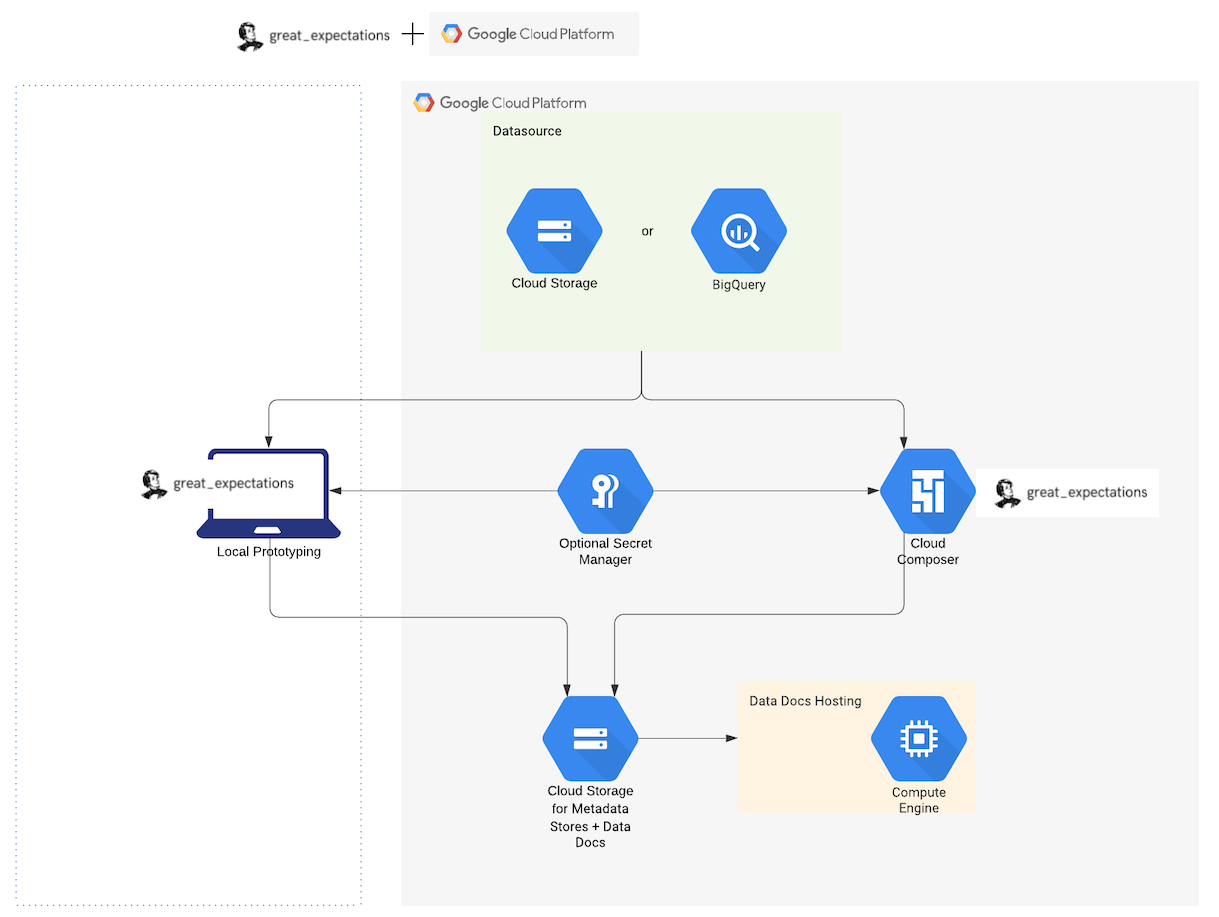
Relevant documentation for the components can also be found here:
- How to configure an Expectation store to use GCS
- How to configure a Validation Result store in GCS
- How to host and share Data Docs on GCS
- Optionally, you can also use a Secret Manager for GCP Credentials
A small number of V3 Expectations have not been migrated to BigQuery, and will be very soon. These include:
-
expect_column_quantile_values_to_be_between -
expect_column_kl_divergence_to_be_less_than
Part 1: Local Configuration of Great Expectations that connects to Google Cloud Platform
1. If necessary, upgrade your Great Expectations version
The current guide was developed and tested using Great Expectations 0.13.49. Please ensure that your current version is equal or newer than this.
A local installation of Great Expectations can be
upgraded using a simple
pip install command with the
--upgrade flag.
pip install great-expectations --upgrade
2. Connect to Metadata Stores on GCP
The following sections describe how you can take a basic local configuration of Great Expectations and connect it to Metadata stores on GCP.
The full configuration used in this guide can be found
in the
great-expectations repository
and is also linked at the bottom of this document.
When specifying prefix values for
Metadata Stores in GCS, please ensure that a
trailing slash / is not included (ie
prefix: my_prefix/ ). Currently this
creates an additional folder with the name
/ and stores metadata in the
/ folder instead of
my_prefix.
Add Expectations Store
By default, newly profiled Expectations are stored in
JSON format in the
expectations/ subdirectory of your
great_expectations/ folder. A new
Expectations Store can be configured by adding the
following lines into your
great_expectations.yml file, replacing
the project, bucket and
prefix with your information.
expectations_GCS_store:
  class_name: ExpectationsStore
  store_backend:
    class_name: TupleGCSStoreBackend
    project: <your>
    bucket: <your>
    prefix: <your>
Great Expectations can then be configured to use this
new Expectations Store,
expectations_GCS_store, by setting the
expectations_store_name value in the
great_expectations.yml file.
expectations_store_name: expectations_GCS_store
For additional details and example configurations, please refer to How to configure an Expectation store to use GCS.
Add Validations Store
By default, Validations are stored in JSON format in
the uncommitted/validations/ subdirectory
of your great_expectations/ folder. A new
Validations Store can be configured by adding the
following lines into your
great_expectations.yml file, replacing
the project, bucket and
prefix with your information.
validations_GCS_store:
  class_name: ValidationsStore
  store_backend:
    class_name: TupleGCSStoreBackend
    project: <your>
    bucket: <your>
    prefix: <your>
Great Expectations can then be configured to use this
new Validations Store,
validations_GCS_store, by setting the
validations_store_name value in the
great_expectations.yml file.
validations_store_name: validations_GCS_store
For additional details and example configurations, please refer to How to configure an Validation Result store to use GCS.
Add Data Docs Store
To host and share Datadocs on GCS, we recommend using the following guide, which will explain how to host and share Data Docs on Google Cloud Storage using IP-based access.
Afterwards, your
great-expectations.yml will contain the
following configuration under
data_docs_sites, with
project, and bucket being
replaced with your information.
gs_site:
  class_name: SiteBuilder
  store_backend:
    class_name: TupleGCSStoreBackend
    project: <your>
    bucket: <your>
  site_index_builder:
    class_name: DefaultSiteIndexBuilder
You should also be able to view the deployed DataDocs site by running the following CLI command:
gcloud app browse
If successful, the gcloud CLI will
provide the URL to your app and launch it in a new
browser window, and you should be able to view the
index page of your Data Docs site.
3. Connect to your Data
The remaining sections in Part 1 contain a simplified
description of
how to connect to your data in GCS
or
BigQuery
and eventually build a
CheckpointThe primary means for validating data in a
production deployment of Great Expectations.
that will be migrated to Cloud Composer. The following
code can be run either in an interactive Python
session or Jupyter Notebook that is in your
great_expectations/ folder. More details
can be found in the corresponding How to Guides, which
have been linked.
- Data in GCS
- Data in BigQuery
To connect to your data in GCS, first instantiate your project's DataContext by importing the necessary packages and modules.
import great_expectations as gx
from great_expectations.core.batch import BatchRequest
Then, load your DataContext into memory using
the get_context() method.
context = gx.get_context()
Next, load the following Datasource configuration that will connect to data in GCS,
datasource_yaml = rf"""
name: my_gcs_datasource
class_name: Datasource
execution_engine:
    class_name: PandasExecutionEngine
data_connectors:
    default_runtime_data_connector_name:
        class_name: RuntimeDataConnector
        batch_identifiers:
            - default_identifier_name
    default_inferred_data_connector_name:
        class_name: InferredAssetGCSDataConnector
        bucket_or_name: <your_gcs_bucket_here>
        prefix: <bucket_path_to_data>
        default_regex:
            pattern: (.*)\.csv
            group_names:
                - data_asset_name
"""
Save the configuration into your DataContext by
using the
add_datasource() function.
context.add_datasource(**yaml.load(datasource_yaml))
For more details on how to configure the Datasource, and additional information on authentication, please refer to How to connect to data on GCS using Pandas
To connect to your data in BigQuery, first instantiate your project's DataContext by importing the necessary packages and modules.
import great_expectations as gx
from great_expectations.core.batch import RuntimeBatchRequest
Then, load your DataContext into memory using
the get_context() method.
context = gx.get_context()
Next, load the following Datasource configuration that will connect to data in BigQuery,
In order to support tables that are created as the result of queries in BigQuery, Great Expectations previously asked users to define a named permanent table to be used as a "temporary" table that could later be deleted, or set to expire by the database. This is no longer the case, and Great Expectations will automatically set tables that are created as the result of queries to expire after 1 day.
datasource_yaml = rf"""
name: my_bigquery_datasource
class_name: Datasource
execution_engine:
  class_name: SqlAlchemyExecutionEngine
  connection_string: bigquery://<gcp_project_name>/<bigquery_dataset>
data_connectors:
   default_runtime_data_connector_name:
       class_name: RuntimeDataConnector
       batch_identifiers:
           - default_identifier_name
   default_inferred_data_connector_name:
       class_name: InferredAssetSqlDataConnector
       name: whole_table
"""
Save the configuration into your DataContext by
using the
add_datasource() function.
context.add_datasource(**yaml.load(datasource_yaml))
For more details on how to configure the BigQuery Datasource, please refer to How to connect to a BigQuery database
4. Get Batch and Create ExpectationSuite
- Data in GCS
- Data in BigQuery
For our example, we will be creating an
ExpectationSuite with
instant feedback from a sample Batch of
data, which we will describe in our
BatchRequest. For additional
examples on how to create ExpectationSuites,
either through
domain knowledge
or using the
User Configurable Profiler, please refer to the documentation under
How to Guides ->
Creating and editing Expectations for your
                                  data
-> Core skills.
First, load a batch of data by specifying a
data_asset_name in a
BatchRequest.
batch_request = BatchRequest(
    datasource_name="version-0.15.50 my_gcs_datasource",
    data_connector_name="version-0.15.50 default_inferred_data_connector_name",
    data_asset_name="version-0.15.50 <your_data_asset_name>",
)
Next, create an ExpectationSuite (test_gcs_suite
in our example), and use it to get a
Validator.
context.add_or_update_expectation_suite(expectation_suite_name="version-0.15.50 test_gcs_suite")

validator = context.get_validator(
    batch_request=batch_request, expectation_suite_name="version-0.15.50 test_gcs_suite"
)
Next, use the Validator to run
expectations on the batch and automatically add
them to the ExpectationSuite. For our example,
we will add
expect_column_values_to_not_be_null
and
expect_column_values_to_be_between
(passenger_count and
congestion_surcharge are columns in
our test data, and they can be replaced with
columns in your data).
validator.expect_column_values_to_not_be_null(column="passenger_count")

validator.expect_column_values_to_be_between(
    column="congestion_surcharge", min_value=0, max_value=1000
)
Lastly, save the ExpectationSuite, which now contains our two Expectations.
validator.save_expectation_suite(discard_failed_expectations=False)
For more details on how to configure the RuntimeBatchRequest, as well as an example of how you can load data by specifying a GCS path to a single CSV, please refer to How to connect to data on GCS using Pandas
For our example, we will be creating our
ExpectationSuite with
instant feedback from a sample Batch of
data, which we will describe in our
RuntimeBatchRequest. For additional
examples on how to create ExpectationSuites,
either through
domain knowledge
or using the
User Configurable Profiler, please refer to the documentation under
How to Guides ->
Creating and editing Expectations for your
                                  data
-> Core skills.
First, load a batch of data by specifying an SQL
query in a
RuntimeBatchRequest (SELECT * from demo.taxi_data LIMIT 10
is an example query for our test data and can be
replaced with any query you would like).
batch_request = RuntimeBatchRequest(
    datasource_name="version-0.15.50 my_bigquery_datasource",
    data_connector_name="version-0.15.50 default_runtime_data_connector_name",
    data_asset_name="version-0.15.50 taxi_data",  # this can be anything that identifies this data
    runtime_parameters={"query": "SELECT * from demo.taxi_data LIMIT 10"},
    batch_identifiers={"default_identifier_name": "default_identifier"},
)
Next, create an ExpectationSuite (test_bigquery_suite
in our example), and use it to get a
Validator.
context.add_or_update_expectation_suite(expectation_suite_name="version-0.15.50 test_bigquery_suite")

validator = context.get_validator(
    batch_request=batch_request, expectation_suite_name="version-0.15.50 test_bigquery_suite"
)
Next, use the Validator to run
expectations on the batch and automatically add
them to the ExpectationSuite. For our example,
we will add
expect_column_values_to_not_be_null
and
expect_column_values_to_be_between
(passenger_count and
congestion_surcharge are columns in
our test data, and they can be replaced with
columns in your data).
validator.expect_column_values_to_not_be_null(column="passenger_count")

validator.expect_column_values_to_be_between(
    column="congestion_surcharge", min_value=0, max_value=1000
)
Lastly, save the ExpectationSuite, which now contains our two Expectations.
validator.save_expectation_suite(discard_failed_expectations=False)
For more details on how to configure the BatchRequest, as well as an example of how you can load data by specifying a table name, please refer to How to connect to a BigQuery database
5. Build and Run a Checkpoint
For our example, we will create a basic Checkpoint
configuration using the
SimpleCheckpoint class. For
additional examples, information on
how to add validations, data, or suites to existing
checkpoints, and
more complex configurations
please refer to the documentation under
How to Guides ->
Validating your data ->
Checkpoints.
- Data in GCS
- Data in BigQuery
Add the following Checkpoint
gcs_checkpoint to the DataContext.
Here we are using the same
BatchRequest and
ExpectationSuite name that we used
to create our Validator above, translated into a
YAML configuration.
my_checkpoint_name = "version-0.15.50 gcs_checkpoint"
checkpoint_config = f"""
name: {my_checkpoint_name}
config_version: 1.0
class_name: SimpleCheckpoint
run_name_template: "%Y%m%d-%H%M%S-my-run-name-template"
validations:
  - batch_request:
      datasource_name: my_gcs_datasource
      data_connector_name: default_inferred_data_connector_name
      data_asset_name: <your_data_asset_name>
    expectation_suite_name: test_gcs_suite
"""
context.add_or_update_checkpoint(**yaml.load(checkpoint_config))
Next, you can either run the Checkpoint directly in-code,
checkpoint_result = context.run_checkpoint(
    checkpoint_name=my_checkpoint_name,
)
or through the following CLI command.
great_expectations --v3-api checkpoint run gcs_checkpoint
At this point, if you have successfully configured the local prototype, you will have the following:
-
An ExpectationSuite in the GCS bucket
configured in
expectations_GCS_store(ExpectationSuite is namedtest_gcs_suitein our example). -
A new Validation Result in the GCS bucket
configured in
validation_GCS_store. -
Data Docs in the GCS bucket configured in
gs_sitethat is accessible by runninggcloud app browse.
Now you are ready to migrate the local configuration to Cloud Composer.
Add the following Checkpoint
bigquery_checkpoint to the
DataContext. Here we are using the same
RuntimeBatchRequest and
ExpectationSuite name that we used
to create our Validator above, translated into a
YAML configuration.
my_checkpoint_name = "version-0.15.50 bigquery_checkpoint"
checkpoint_config = f"""
name: {my_checkpoint_name}
config_version: 1.0
class_name: SimpleCheckpoint
run_name_template: "%Y%m%d-%H%M%S-my-run-name-template"
validations:
  - batch_request:
      datasource_name: my_bigquery_datasource
      data_connector_name: default_runtime_data_connector_name
      data_asset_name: taxi_data
      batch_identifiers:
        default_identifier_name: 1
      runtime_parameters:
        query: SELECT * from demo.taxi_data LIMIT 10
    expectation_suite_name: test_bigquery_suite
"""
context.add_or_update_checkpoint(**yaml.load(checkpoint_config))
Next, you can either run the Checkpoint directly in-code,
checkpoint_result = context.run_checkpoint(
    checkpoint_name=my_checkpoint_name,
)
or through the following CLI command.
great_expectations --v3-api checkpoint run bigquery_checkpoint
At this point, if you have successfully configured the local prototype, you will have the following:
-
An ExpectationSuite in the GCS bucket
configured in
expectations_GCS_store(ExpectationSuite is namedtest_bigquery_suitein our example). -
A new Validation Result in the GCS bucket
configured in
validation_GCS_store. -
Data Docs in the GCS bucket configured in
gs_sitethat is accessible by runninggcloud app browse.
Now you are ready to migrate the local configuration to Cloud Composer.
Part 2: Migrating our Local Configuration to Cloud Composer
We will now take the local GX configuration from Part 1 and migrate it to a Cloud Composer environment so that we can automate the workflow.
There are a number of ways that Great Expectations can be run in Cloud Composer or Airflow.
-
Running a Checkpoint in Airflow using a
bash operator -
Running a Checkpoint in Airflow using a
python operator -
Running a Checkpoint in Airflow using a
Airflow operator
For our example, we are going to use the
bash operator to run the Checkpoint. This
portion of the guide can also be found in the
following
Walkthrough Video.
1. Create and Configure a Service Account
Create and configure a Service Account on GCS with the appropriate privileges needed to run Cloud Composer. Please follow the steps described in the official Google Cloud documentation to create a Service Account on GCP.
In order to run Great Expectations in a Cloud Composer environment, your Service Account will need the following privileges:
Composer WorkerLogs ViewerLogs WriterStorage Object CreatorStorage Object Viewer
If you are accessing data in BigQuery, please ensure your Service account also has privileges for:
BigQuery Data EditorBigQuery Job UserBigQuery Read Session User
2. Create Cloud Composer environment
Create a Cloud Composer environment in the project you will be running Great Expectations. Please follow the steps described in the official Google Cloud documentation to create an environment that is suited for your needs.
The current Deployment Guide was developed and tested in Great Expectations 0.13.49, Composer 1.17.7 and Airflow 2.0.2. Please ensure your Environment is equivalent or newer than this configuration.
3. Install Great Expectations in Cloud Composer
Installing Python dependencies in Cloud Composer can
be done through the Composer web Console
(recommended), gcloud or through a REST
query. Please follow the steps described in
Installing Python dependencies in Google Cloud
to install great-expectations in Cloud
Composer. If you are connecting to data in BigQuery,
please ensure sqlalchemy-bigquery is also
installed in your Cloud Composer environment.
If you run into trouble while installing Great Expectations in Cloud Composer, the official Google Cloud documentation offers the following guide on troubleshooting PyPI package installations.
4. Move local configuration to Cloud Composer
Cloud Composer uses Cloud Storage to store Apache
Airflow DAGs (also known as workflows), with each
Environment having an associated Cloud Storage bucket
(typically the name of the bucket will follow the
pattern
[region]-[composer environment
                            name]-[UUID]-bucket
).
The simplest way to perform the migration is to move
the entire local
great_expectations/ folder from
Part 1
to the Cloud Storage bucket where Composer can access
the configuration.
First open the Environments page in the Cloud Console, then click on the name of the environment to open the Environment details page. In the Configuration tab, the name of the Cloud Storage bucket can be found to the right of the DAGs folder.
This will take you to the folder where DAGs are
stored, which can be accessed from the Airflow worker
nodes at: /home/airflow/gcsfuse/dags. The
location we want to uploads
great_expectations/ is
one level above the
/dags folder.
Upload the local
great_expectations/ folder either
dragging and dropping it into the window, using
gsutil cp, or by clicking the
Upload Folder button.
Once the great_expectations/ folder is
uploaded to the Cloud Storage bucket, it will be
mapped to the Airflow instances in your Cloud Composer
and be accessible from the Airflow Worker nodes at the
location:
/home/airflow/gcsfuse/great_expectations.
5. Write DAG and Add to Cloud Composer
- Data in GCS
- Data in BigQuery
We will create a simple DAG with a single node
(t1) that runs a
BashOperator, which we will store
in a file named:
ge_checkpoint_gcs.py.
from datetime import timedelta

import airflow
from airflow import DAG
from airflow.operators.bash import BashOperator

default_args = {
    "start_date": airflow.utils.dates.days_ago(0),
    "retries": 1,
    "retry_delay": timedelta(days=1),
}

dag = DAG(
    "GX_checkpoint_run",
    default_args=default_args,
    description="running GX checkpoint",
    schedule_interval=None,
    dagrun_timeout=timedelta(minutes=5),
)

# priority_weight has type int in Airflow DB, uses the maximum.
t1 = BashOperator(
    task_id="checkpoint_run",
    bash_command="(cd /home/airflow/gcsfuse/great_expectations/ ; great_expectations checkpoint run gcs_checkpoint ) ",
    dag=dag,
    depends_on_past=False,
    priority_weight=2**31 - 1,
)
The BashOperator will first change
directories to
/home/airflow/gcsfuse/great_expectations, where we have uploaded our local
configuration. Then we will run the Checkpoint
using same CLI command we used to run the
Checkpoint locally:
great_expectations --v3-api checkpoint run gcs_checkpoint
To add the DAG to Cloud Composer, move
ge_checkpoint_gcs.py to the
environment's DAGs folder in Cloud Storage.
First, open the Environments page in the Cloud
Console, then click on the name of the
environment to open the Environment details
page.
On the Configuration tab, click on the name of the Cloud Storage bucket that is found to the right of the DAGs folder. Upload the local copy of the DAG you want to upload.
For more details, please consult the official documentation for Cloud Composer
We will create a simple DAG with a single node
(t1) that runs a
BashOperator, which we will store
in a file named:
ge_checkpoint_bigquery.py.
from datetime import timedelta

import airflow
from airflow import DAG
from airflow.operators.bash import BashOperator

default_args = {
    "start_date": airflow.utils.dates.days_ago(0),
    "retries": 1,
    "retry_delay": timedelta(days=1),
}

dag = DAG(
    "GX_checkpoint_run",
    default_args=default_args,
    description="running GX checkpoint",
    schedule_interval=None,
    dagrun_timeout=timedelta(minutes=5),
)

# priority_weight has type int in Airflow DB, uses the maximum.
t1 = BashOperator(
    task_id="checkpoint_run",
    bash_command="(cd /home/airflow/gcsfuse/great_expectations/ ; great_expectations checkpoint run bigquery_checkpoint ) ",
    dag=dag,
    depends_on_past=False,
    priority_weight=2**31 - 1,
)
The BashOperator will first change
directories to
/home/airflow/gcsfuse/great_expectations, where we have uploaded our local
configuration. Then we will run the Checkpoint
using same CLI command we used to run the
Checkpoint locally:
great_expectations --v3-api checkpoint run bigquery_checkpoint
To add the DAG to Cloud Composer, move
ge_checkpoint_bigquery.py to the
environment's DAGs folder in Cloud Storage.
First, open the Environments page in the Cloud
Console, then click on the name of the
environment to open the Environment details
page.
On the Configuration tab, click on the name of the Cloud Storage bucket that is found to the right of the DAGs folder. Upload the local copy of the DAG you want to upload.
For more details, please consult the official documentation for Cloud Composer
6. Run DAG / Checkpoint
Now that the DAG has been uploaded, we can trigger the DAG using the following methods:
- Trigger the DAG manually.
- Trigger the DAG on a schedule, which we have set to be once-per-day in our DAG
- Trigger the DAG in response to events.
In order to trigger the DAG manually, first open the Environments page in the Cloud Console, then click on the name of the environment to open the Environment details page. In the Airflow webserver column, follow the Airflow link for your environment. This will open the Airflow web interface for your Cloud Composer environment. In the interface, click on the Trigger Dag button on the DAGs page to run your DAG configuration.
7. Check that DAG / Checkpoint has run successfully
If the DAG run was successful, we should see the
Success status appear on the DAGs page of
the Airflow Web UI. We can also check so check that
new Data Docs have been generated by accessing the URL
to our gcloud app.
8. Congratulations!
You've successfully migrated your Great Expectations configuration to Cloud Composer!
There are many ways to iterate and improve this
initial version, which used a
bash operator for simplicity. For
information on more sophisticated ways of triggering
Checkpoints, building our DAGs, and dividing our Data
Assets into Batches using DataConnectors, please refer
to the following documentation:
-
How to run a Checkpoint in Airflow using a
python operator. -
How to run a Checkpoint in Airflow using a
Great Expectations Airflow operator(recommended). - How to trigger the DAG on a schedule.
- How to trigger the DAG on a schedule.
- How to trigger the DAG in response to events.
- How to use the Google Kubernetes Engine (GKE) to deploy, manage and scale your application.
- How to configure a DataConnector to introspect and partition tables in SQL.
- How to configure a DataConnector to introspect and partition a file system or blob store.
Also, the following scripts and configurations can be found here:
-
Local GX configuration used in this guide can be
found in the
great-expectationsGIT repository. - Script to test BigQuery configuration.
- Script to test GCS configuration.